
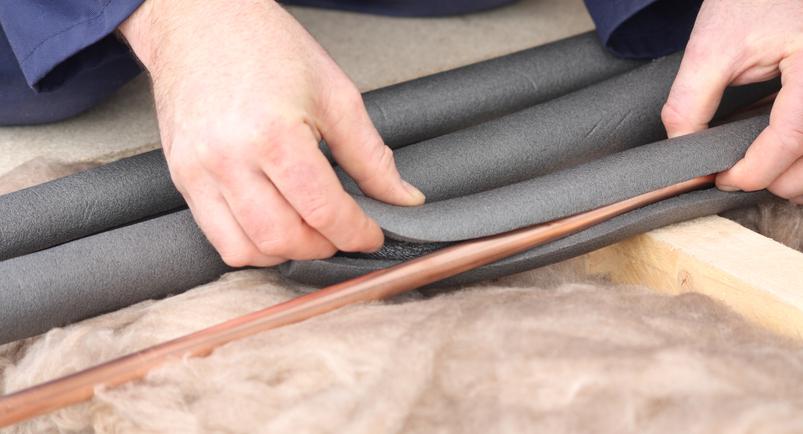
For most homeowners, the decision to start insulating hot water pipes is an easy one. Foam pipe sleeves are inexpensive, available at any hardware store, and straightforward enough to install in an afternoon. The payoff, in energy savings, faster hot water, quieter pipes, and fewer freeze events, adds up for years after a single afternoon of work.
But not all homeowners know about this simple efficiency upgrade, the specific benefits of insulating cold water pipes as well, or how to choose the right insulation for different parts of the system. Here is everything you need to know about water pipe insulation: why it matters, where to start, what materials to use, and when to call a plumber.
The Benefits of Insulating Hot Water Pipes
Hotter Water Faster
If you have a traditional tank, you are already paying to keep a large volume of hot water on standby around the clock. Hot water waiting in the pipes between the heater and your fixtures loses heat to the surrounding air during that wait, which is why turning on a distant tap often means waiting for the hot water to travel from the heater before you feel it at the faucet.
Insulating hot water pipes dramatically slows that heat loss. According to the U.S. Department of Energy, quality hot water pipe insulation can raise the water temperature delivered to your fixtures by 2°F to 4°F compared to uninsulated pipes. That means you can reach your desired temperature faster with less water running down the drain while you wait, saving both water and energy. Water heater services can help ensure optimal efficiency.
Energy Savings
The DOE estimates that insulating hot water pipes can save homeowners 3% to 4% annually on water heating costs. In homes where the water heater is located far from the bathrooms or kitchen, where long pipe runs lose significant heat before the water reaches its destination, the savings can be higher. The payback period on the cost of pipe insulation materials is typically well under a year, making it one of the highest return-on-investment plumbing upgrades available. Anything that reduces standby heat loss also reduces how often your water bill climbs for no obvious reason.
Quieter Pipes
If you hear a loud knocking or clanking sound when you run hot water, that noise is often caused by metal pipes expanding as they warm up with the flow of heated water. The expansion causes the pipe to shift slightly against framing or other fixed surfaces, creating the tapping or banging sound. Insulating hot water pipes cushions this thermal movement and reduces or eliminates the noise, which can be a significant comfort improvement in older homes with exposed copper piping in ceilings or walls.
If the knocking sounds sharp and rhythmic rather than gradual, it may be water hammer rather than thermal expansion. Our article on water hammer covers that specific issue in detail.
The Benefits of Insulating Cold Water Pipes
Once you are already installing insulation on hot water pipes, adding it to cold water runs costs very little in additional materials, and the benefits are meaningful.
Preventing Frozen Pipes
Cold water pipes in unheated spaces, including basements, crawl spaces, attics, garages, and areas along exterior walls, are at risk of freezing when temperatures drop. When water inside a pipe freezes, it expands with enough force to crack or burst the pipe, sometimes before you realize anything has gone wrong. Frozen pipes that burst can release large volumes of water into your home very quickly. Foam or fiberglass insulation on cold water pipes in vulnerable locations significantly slows how fast the pipe cools in a freeze event, providing critical extra time before the pipe reaches the freezing threshold.
Preventing Summer Heat Gain
Cold water pipes exposed to warm outdoor air or located in unventilated spaces like attics can absorb ambient heat during summer, raising the temperature of your cold water supply. While this is less dramatic than freezing, it affects water taste and can slightly increase the load on your water heater if cold lines run alongside hot lines. Insulation keeps your cold water colder through warm months as well.
Preventing Condensation Damage
In high-humidity environments, cold water pipes collect condensation on their exterior surface. This is the same phenomenon you see on a cold glass on a warm day. Over time, that condensation drips from the pipe onto whatever lies beneath, including stored furniture, boxes, and building materials. Insulation acts as a vapor barrier, keeping the pipe surface from reaching the dew point and eliminating condensation entirely. If you store anything valuable in a basement beneath uninsulated cold water pipes, this is reason enough to add insulation.
Where to Start: Prioritizing Which Pipes to Insulate
You do not need to insulate every foot of pipe in your home to get the majority of the benefit. Starting with the highest-impact locations first makes sense.
The first three feet of both the hot water outlet and cold water inlet pipes at your water heater are the highest priority for insulating hot water pipes. Hot water loses the most heat in the first stretch of pipe immediately after leaving the heater, and insulating this section delivers the fastest payback. If your home has tankless water heaters, the pipes leaving the unit still benefit from insulation on any exposed or unheated runs.
After the water heater connections, prioritize long runs of exposed hot water pipe, particularly those passing through unheated spaces. Any hot water pipe in a basement, crawl space, garage, or attic that is not already enclosed within insulated wall framing should be considered.
For cold water pipes, prioritize any pipe in an unheated space, any pipe along an exterior wall with limited insulation, and any pipe in a location where condensation is currently a visible problem. A plumbing inspection can help you map out where your most vulnerable pipe runs are located, especially if some of them are concealed in areas you rarely access.
Types of Pipe Insulation
Several materials are available for insulating hot water and cold water pipes, each with different strengths.
Foam pipe sleeves are the most common choice for residential hot and cold water pipe insulation. Made from polyethylene or rubber-based foam, they come in a range of diameters to match your pipe size and are pre-slit lengthwise so they slip directly over the pipe. Most pipe diameters fall between 3/8 inch and 1 inch, and the sleeve diameter needs to match the pipe's outside diameter for a snug fit. The 5/8-inch-thick foam sleeves provide more insulation than the thinner 3/8-inch variety and are better suited for cold climates or pipes in the coldest locations. Conventional foam sleeves should be taped along the slit after installation. Self-sealing sleeves have an adhesive strip along the slit that eliminates the tape step. Both types should be secured with acrylic tape or cable ties every one to two feet to keep them from sliding on vertical runs.
Fiberglass pipe wrap is the appropriate choice near gas water heaters, where pipe insulation must be kept at least 6 inches from the flue vent. Foam insulation placed within 8 inches of a gas appliance flue can emit toxic gases if it ignites. For those areas, use fiberglass pipe wrap at least 1 inch thick, secured with wire or aluminum foil tape. When working with fiberglass, wear long sleeves, gloves, and eye protection to avoid skin and eye irritation from the fibers.
Rubber or elastomeric foam is a closed-cell material that provides both thermal insulation and a built-in moisture barrier. It is particularly effective on cold water pipes in humid environments because it resists condensation penetration better than open-cell foam. It is more expensive than basic polyethylene foam but offers better long-term durability in damp basements and crawl spaces.
Spray foam insulation is applied by professionals using pressurized equipment and is best suited for irregular pipe layouts, pipes running very close to exterior walls, or areas where traditional sleeves cannot be fitted without cutting into framing. It expands and hardens around the pipe, filling gaps and providing a complete seal in spaces where standard sleeve products cannot reach.
How to Insulate Hot Water Pipes: DIY Steps
Insulating accessible hot water and cold water pipes is a manageable DIY project for most homeowners. Our guide on DIY plumbing tools covers the basic toolkit you will want on hand for projects like this.
Step 1: Measure your pipes.
Note the outside diameter of your pipes. Typical residential supply lines are 1/2 inch or 3/4 inch in diameter. Purchase foam sleeves that match this diameter. Measure the total linear footage of pipe you plan to insulate and add about 10 percent for waste from cutting.
Step 2: Clean the pipe surface.
Wipe pipes down with a dry cloth before installing insulation. Self-sealing adhesive strips will not bond reliably to dusty or greasy pipe surfaces, particularly on basement or crawl space pipes.
Step 3: Cut and fit the sleeves.
Starting at the water heater, measure and cut foam sleeves to length with scissors or a utility knife. For straight runs, cut square. For corners, miter the ends of two pieces at 45 degrees so they meet cleanly at the bend. Fit the sleeve over the pipe with the slit facing down and press closed.
Step 4: Seal all seams.
Tape every slit, every joint between sleeve sections, and every corner fitting with foil tape or acrylic tape. This step creates a continuous vapor barrier that prevents moisture from entering the insulation from the outside and significantly improves thermal performance. Skipping this step is the most common DIY installation mistake.
Step 5: Secure against sagging.
On vertical pipe runs, add cable ties or tape bands every foot or so to prevent the sleeves from sliding down over time.
Pipe insulation is particularly important to complete before winter. Our full winterizing pipes guide covers how pipe insulation fits into a complete cold-weather preparation plan, including outdoor plumbing connections like hose bibbs and irrigation shutoffs.
When to Hire a Professional
Insulating accessible pipe runs is a straightforward DIY project. However, a plumber is the right call in a few situations.
If you discover leaking pipes, corrosion, or damaged fittings while inspecting pipes for insulation, insulation should not be installed over those issues. Covering a failing pipe with foam conceals the problem and can accelerate corrosion by trapping moisture. Address the underlying issue first. If your pipes are located in extremely difficult-to-access spaces where spray foam is needed, or if you are unsure about clearances near gas appliances, professional installation is the safer and more reliable option.
Our licensed team also handles plumbing installation and upgrades, including pipe insulation as part of larger water heater or piping projects where full access to previously enclosed runs is available.
Call us anytime at (800) 259-7705 or book an appointment online. You can also find a location to connect with your local team.
















 Your Privacy Choices